
-
Tools for craftsman furniture
I've been doing basic woodworking for a while, and I want to start moving into furniture (mostly for my own enjoyment). I strongly prefer the aesthetics of craftsman/mission/prairie style (Gustav Stickley, et al.) I'm trying to make a list of the basic power tools that would be necessary/useful for that style of furniture, along with hand tools, and I'd appreciate feedback from people with more experience than I.
I already have a very basic work bench; I think that I probably need to make a work bench that I can use bench dogs on; a roubo workbench be ideal. I also definitely need to make an infeed and outfeed table for my table saw so I can work with plywood sheet more easily.
(I have a number of these, but not everything.)
Table saw (ideally a cabinet saw)
-miter gauge
-dado blade
-tenoning jig
Miter saw
Band saw (ideally 2; one that could do re-saw work, and a smaller one for cutting curves)
Jointer (ideally long bed)
Planer
Router
-tongue and groove set
Drill press (?)
Mortising machine
Random orbit sander
Finish sander
Dust collection
Dovetail jig set (for drawers)
Doweling jig (?)
Hand planes (kind of a long list here...)
Chisels
-mortising chisels
-paring chisels
-flushing chisels
Card scraper
Marking tools
-Scribe
-marking knife
Combination square
Tape measure
Calipers w/ depth gauge
Clamps
-Parallel clamps
-pipe clamps, etc.
Is there anything that I'm missing that I should be thinking about? (Quick edit - I don't have a lathe on here because I have zero interest in turning anything. I don't think that things like a belt or spindle sander, or a shaper, would really do much of anything for the style I prefer. A router table might be useful though.)
-
Workbench designs
Do you have a favorite workbench? What kind of features does it have?
Just looking for some inspiration.
-
Brick Pattern End Grain Cutting Board

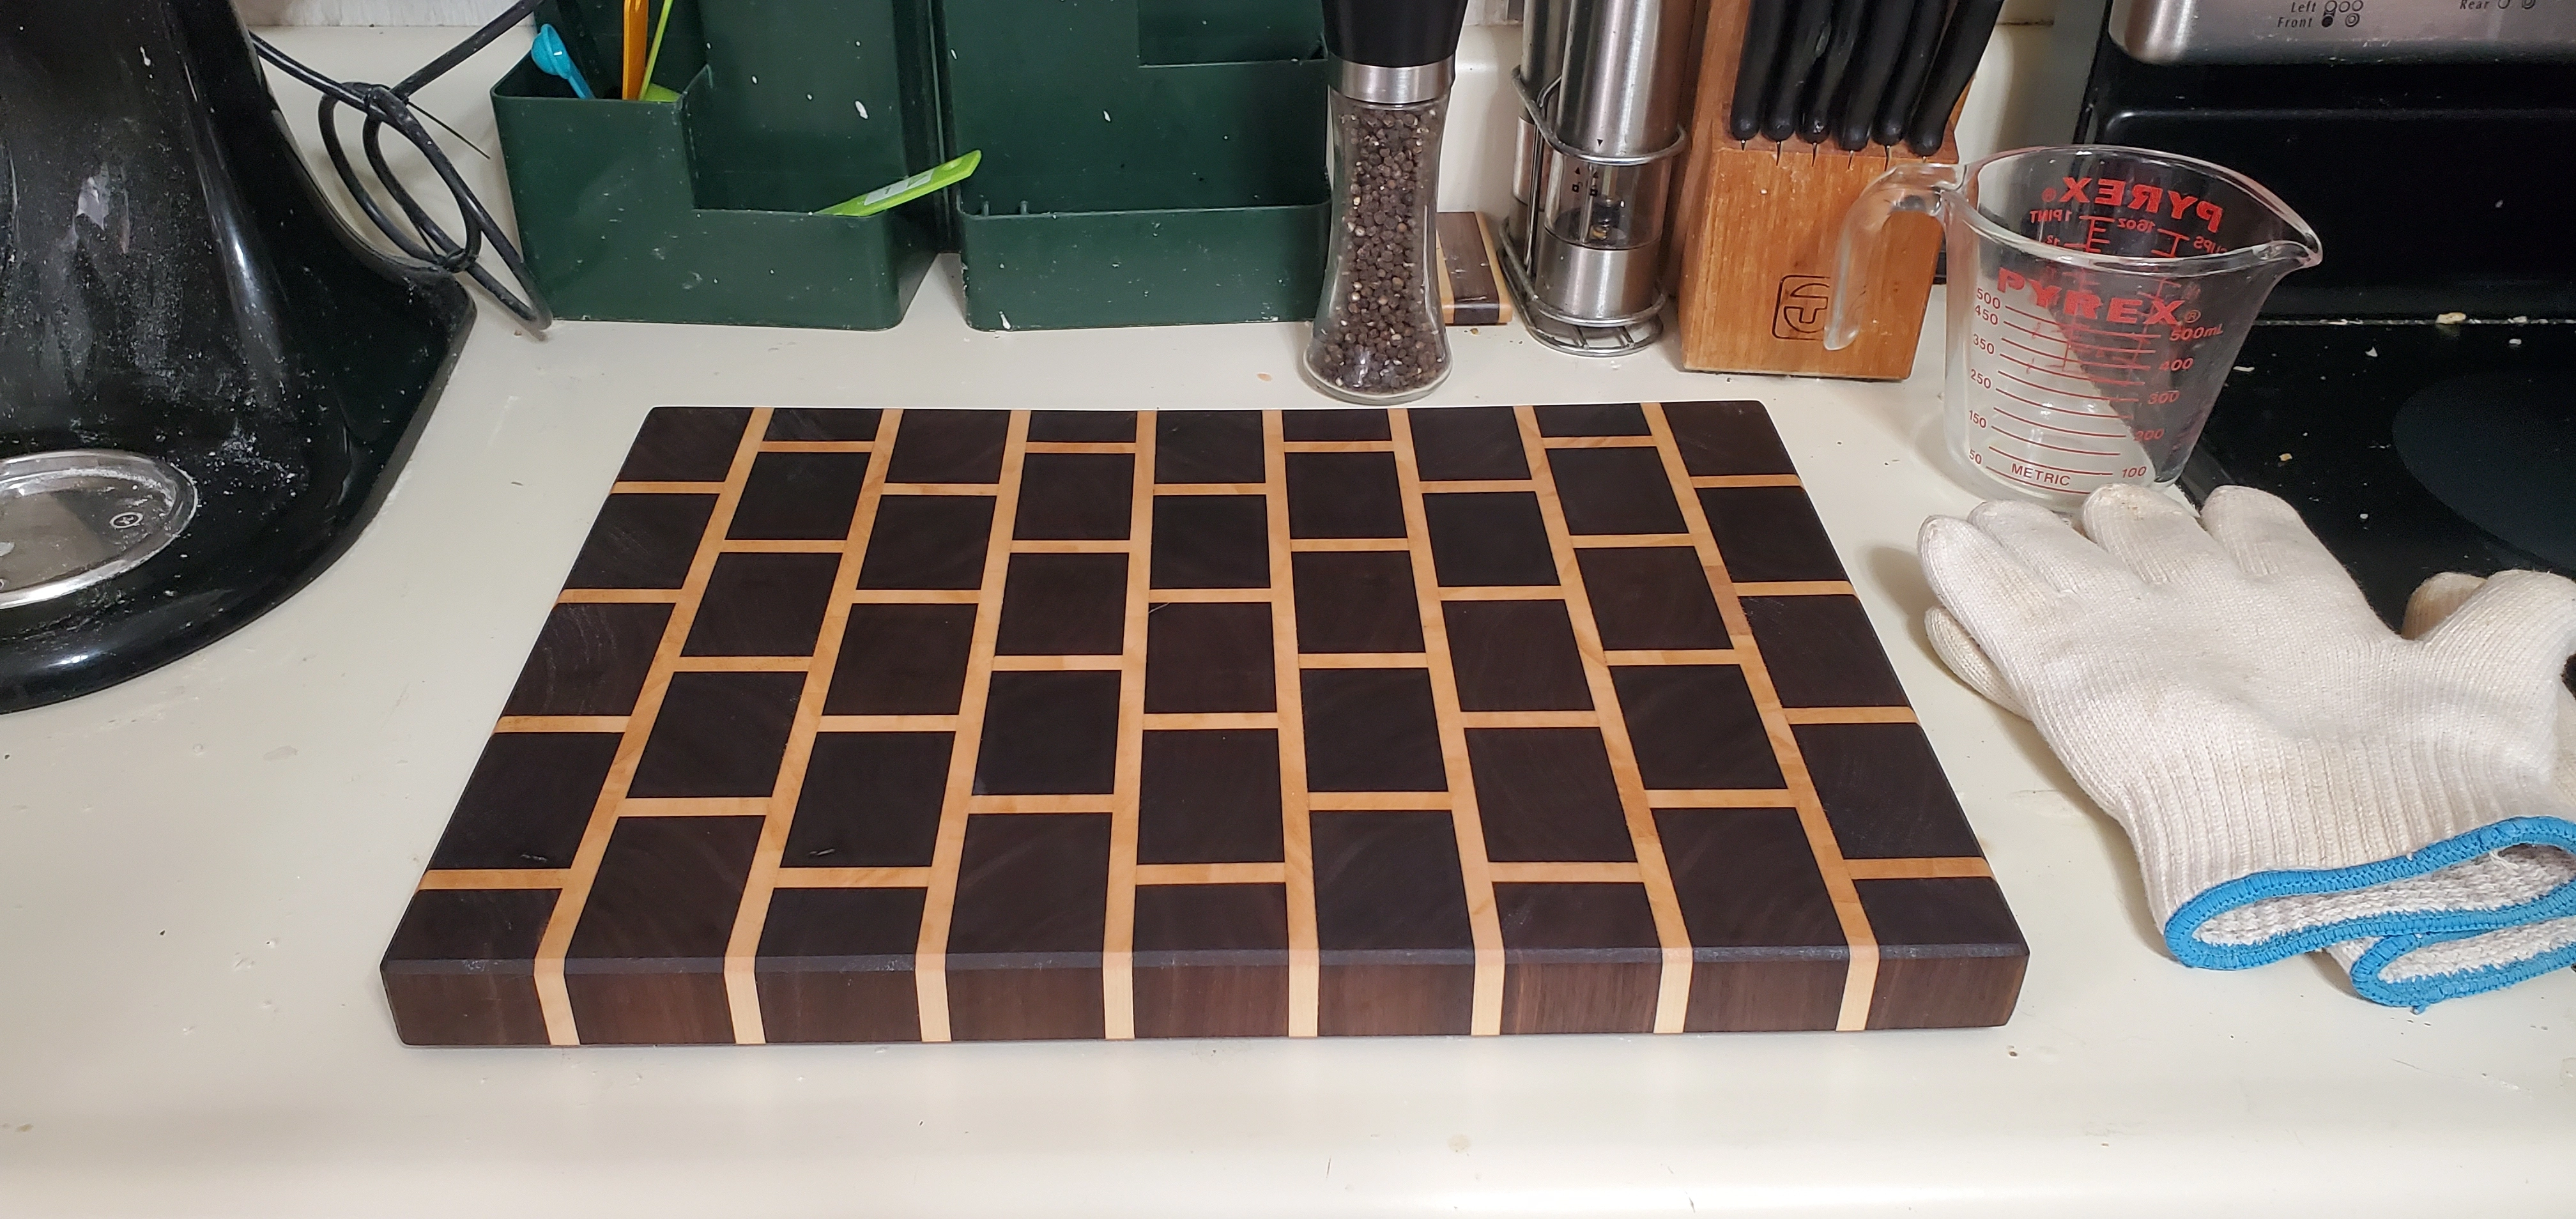
Walnut and maple., it's an inch and a quarter thick, 12 1/2 inches wide and about 17 inches long. While it is an end grain cutting board I actually built it with kneading dough in mind, I don't intend to cut on this one, not for awhile anyway. Built it this weekend and baked some bread with it today. Which is why my mixer is covered in flour. I'm really happy with this one.
-
When you hear "Solid wood", how do you interpret that?
Do you include things like particle board, MDF, plywood etc? Is there a line? And if so, what is it for you?
-
Slightly offbalanced Epoxy-Resin: can it be saved?
Hey, I am asking here because I found no better community.
I am using Epoxy Resin quite a lot simply for glueing stuff together, not the other type for like transparent furniture and all.
I glued something but added too much resin and too little of the "Härter" compound.
So it stays sticky.
I read heat could help but doubt it. Do I need to remove it and apply again?
-
Getting the hang of sharpening & setting up my inherited plane


It took lots of repetition honing, stropping, going through setup, realizing the chip breaker was right on the edge of the blade, repeat, new error. The first picture is progress: small and crunchy, long and crinkley, long and papery.
Sharpening using Atoma 400/600/1200 diamond plates + a strop I had around. I found Wood By Wright's setup video helpful and have been enjoying Rex Kreuger's videos on sharpening and other things.
I worked so hard for these shavings, surely there's something fun to do with them.
-
3D printed sharpening angle jig
www.printables.com Chisel/Planer Knife Sharpening Angle Jig by Magrath | Download free STL model | Printables.comJig to help you line up your chisel or planer knife with the correct angle for sharpening | Download free 3D printable STL models

I've designed a 3D printable sharpening angle jig for your chisel and planer knife. Works with those cheap triangle shaped blade holders you can find almost anywhere for cheap. Check it out if you're got a 3D printer.
-
Box joint jig (no dado) and demo box
I made a box joint jig following [https://www.youtube.com/watch?v=EyJof__nTR4](Woodfather's video). It's a nice simple/flexible design for those of us without a dado stack.
First try was very sloppy, but once I adjusted the key width and got my clamps set up better the fit is great. The scraps I had around were bed slats off the curb, which were very cupped. But they actually turned out pretty nicely (after plenty of cleanup).
Boiled linseed oil finish.
-
Question: dies anyone here do restoration?
I have a 1920's roll-top desk that is in okay condition but needs restoration.
I got it off the side of a driveway thinking I would restore it but I just have too many projects.
At this point I would like to give it to anyone who would want it. Anyone have any ideas? I don't really want to do craigslist or anything like that because I don't want a bunch of random folks coming to my house.
-
UPDATE: The slab is flat... ish


There is a lot more checking than I realized, and I'm afraid filling these gaps by just pouring in epoxy will be difficult. I want to keep the live edge and avoid making a complete deep pour epoxy mold. Some of these gaps go all the way through The 2-in slab. Any tips for me?
-
New instrument! A rebec - kind of an early precursor of a violin.

Most parts are cnc-carved. The body is usually carved from a single block of wood, but for my cnc, I split it into three parts, including a decorative strip of amaranth.
Vibrating string length 29.5cm (3/4 violin). Strings are Aquila F-Red superior tension, G-D-A.
Materials used: maple, spruce, amaranth, ebony.
Some build pics: !https://pxscdn.com/public/m/_v2/632520794410387667/586f75268-5004eb/p0WyoXm7hbXQ/8UuyIqEgB7QXTob7l3gnyINpnnoAdVXPuFSdwCU3.jpg !https://pxscdn.com/public/m/_v2/632520794410387667/586f75268-5004eb/W0pwDFUugibK/796cZ7IMdFWwtGAqbxV8o5aX6FDZA0MY7pn7srWu.jpg !https://pxscdn.com/public/m/_v2/632520794410387667/586f75268-5004eb/cGr758rOlcKG/wYshSIstTgNVQeD9SP3JnV1HWJMBxFVBIiUaau9w.jpg !https://pxscdn.com/public/m/_v2/632520794410387667/586f75268-5004eb/MAAlUaDPI6w3/MZkE6pilc8pzFtGL6iS9AVoM927gEPhzVZsiehC9.jpg !https://pxscdn.com/public/m/_v2/632520794410387667/586f75268-5004eb/54tFPFbmKaSG/yV5SGVL56BsQtuSTgzIKTsIDRqGYX8BS2B2hUrTR.jpg !https://pixelfed.social/storage/m/_v2/632520794410387667/586f75268-5004eb/DJXZ42HTD65o/VG81W50MWzUfITDaw7Yt35qHHe5wXw7ZJs4pLLOo.gif
-
Love a good set of rim jobs


Continued from previous posts. As usual, it took longer than expected, but here are the rims all bent and blocked up. Next steps will be getting the tops and backs all braced up and voiced. After that I’ll install the kerfed lining and side braces, do some final bowl sanding, notch the lining and finally put the boxes together. Simple as that.
Should have more to share in the coming weeks.
Thanks for the support! Happy to answer any questions!
-
Advice for managing folding table legs
Noob here
I have a wooden sheet of plywood that acts as a protective topper for an outdoor bath tub (don't ask). I'm looking for a way to add folding legs to the underside that will rest in the bath tub when the topper is on, and fold out to form a table sitting alongside the bathtub while it's in use


